Tuesday, May 14, 2013

Here in Florida, my unwanted guests are usually bugs, snakes, scorpions...

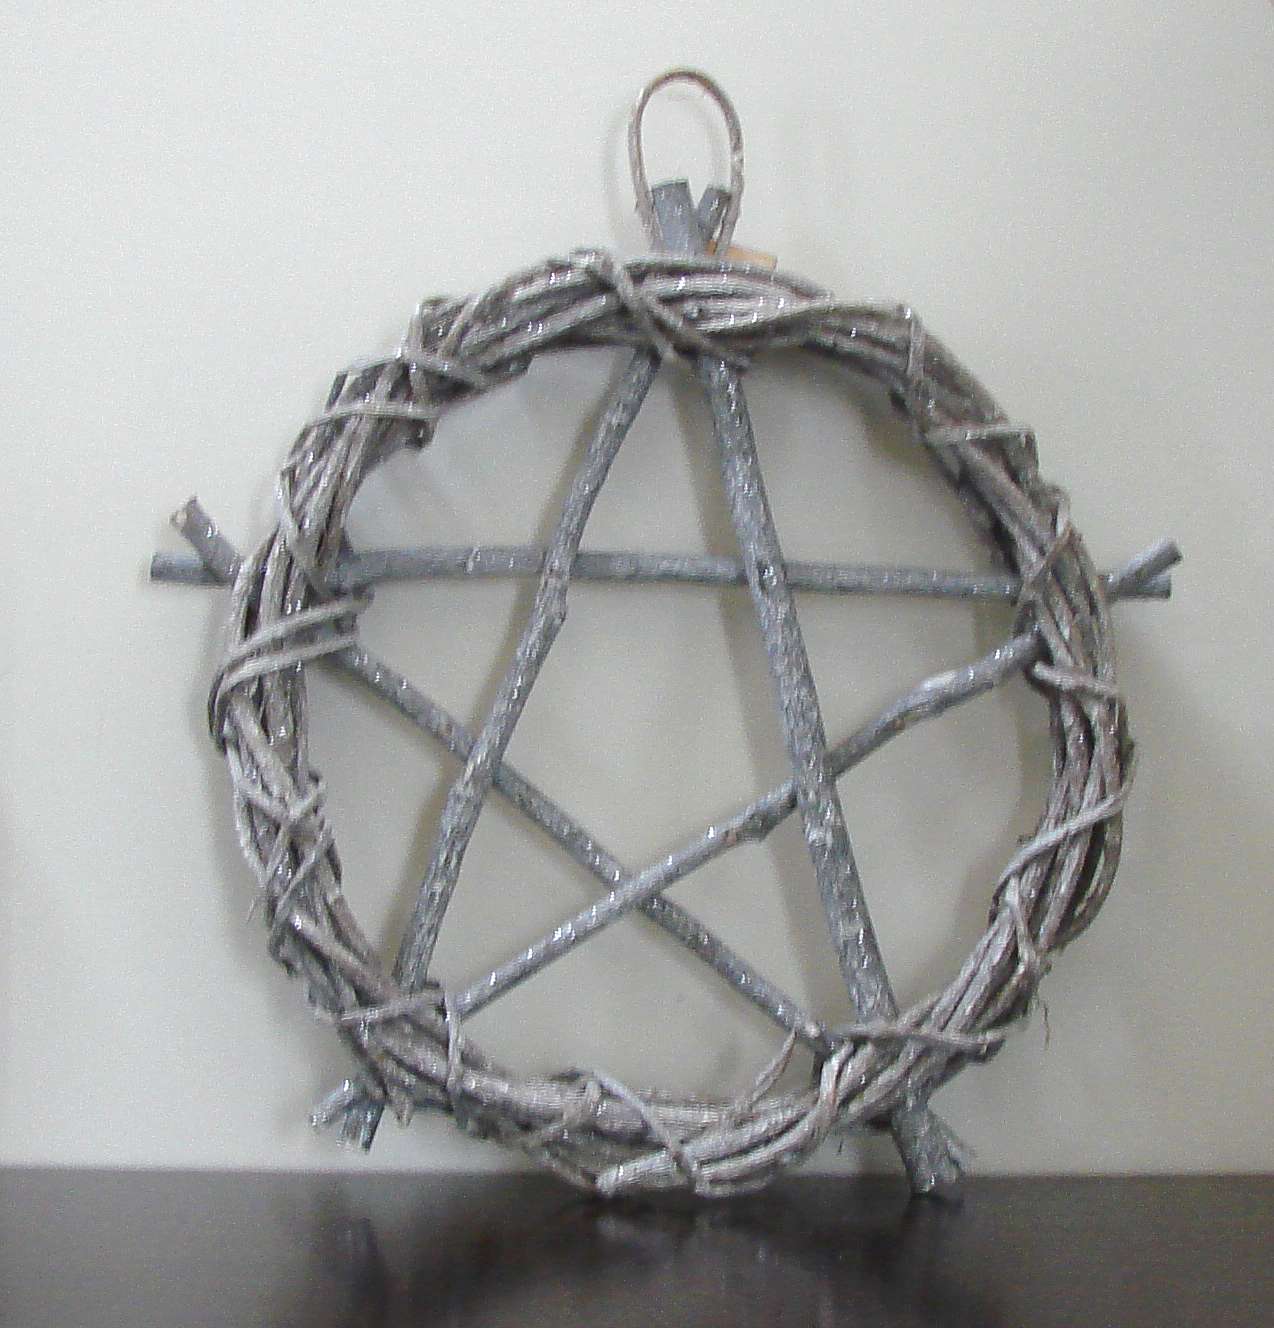
I thought that the great brownish/grey color and rustic look of this piece would look great in the bedroom redo maybe leaning up against a modern mirror.  Then my husband reminded me that in Buffy the Vampire Slayer, every demon who came out of the ground came through a symbol like this.  Back it goes - stat - because I'm thinking that I really shouldn't have any "portal to hell" decor.  Sigh...


Now, I just need to make sure it doesn't fall over so it is lying flat on the ground and that no one accidentally cuts their finger on it before I can get it outta here.

 *This post was written before I changed the name of my blog.*

Thursday, February 28, 2013

New bed!

Yea! It still needs a little extra poly, but otherwise, the bed is done!!! I wanted it to look like the Pottery Barn Farmhouse bed. Big thanks to Ana White and a modification of the bed that I saw on her Brag Post page here: http://ana-white.com/2011/03/modified-farmhouse-bed-0.  I am so very happy!  It really looks beautiful with the dresser I built.


my bed
PB bed


And just as a reminder....
before

 
after

 *This post was written before I changed the name of my blog.*

Friday, February 22, 2013

I like your hat, Mrs. Nesbitt!


Usually, I pull my dust mask down to my neck when I am don't need it, but the metal nose thing was bugging me so I guess I had put it on my head.  Like a little hat.  I didn't realize until I walked into my bathroom that this is how I looked to my neighbors.

I was wearing my hat while working on the modification of Ana White's farmhouse bed.  Hopefully, it will be finished this weekend.   Yea!!

*This post was written before I changed the name of my blog.*

Thursday, February 21, 2013

Time for a new bed, bedding, window treatments...

When we first picked out our home, I had great ideas for the master bedroom.  I loved how our old one was decorated, but I wanted something a little more modern this time.  We picked out a great celery green color which the builder painted, and I found steel grey bedding and cool round stool/ottoman from my beloved TJs.    I thought the room would come together beautifully (and quickly.)  This is how Macy's envisioned the bedding - gorgeous!


 And here it is in our room...


Now, I know you're thinking, "Dang, girl!  You need to audition for Design Star!"  To which I would say:  magic like this is tough to recreate.  Mainly because it is so painful to look at. 

PAINT:  As soon as the paint when up and I saw it during full sun, all I could hear in my head was, "you could even say it glowed."  Yep, I should know to never pick out a paint color without seeing it in a room at different times of the day because the light makes such a big difference.  It also made the tile in the shower look kind of pink.  (Big thanks to Annette for consoling me!)

BLINDS:  $50 blinds  shouldn't break during the first year of use, but I think it was the Design Gods stepping in to let me know that a red next to glowing green only looks good on the red-eyed tree frog I saw on Wild Kratts.

BEDDING:  What can I say.  I bought a duvet even though I know I hate how the comforter moves all around even if you try to staple the corners of the comforter to said duvet.  And bed skirts.  Bed skirts hate me.  This one is slick, so it really moves around.  In a couple of days, it had moved leaving a huge pile on the floor and no coverage on the other.  Plus, we have a really high "pillow top" mattress which is Latin for "no sheet will ever fit" so the combo of a half-naked pillow top mattress and shlumpy bed skirt is really unfortunate.

Side note:  We did have one year when our rescue dog, Xena the Warrior Princess, spent most every day hiding under a bed - the heavily fortified cotton bed skirt made her feel safe.  This bed skirt is good for only one thing - making Cleetus feel he is invisible.  There is going to be hell to pay when I get rid of it.

This will all be remedied in an upcoming post!

 *This post was written before I changed the name of my blog.*

Wednesday, February 13, 2013

Shaker Style Dresser Plans

The dresser plans are finally complete!  You can see by the picture below that these plans are a little different than the dresser that I built.

The first design difference is how I constructed the sides and legs. I made this change because it is simpler and sleeker.  I  made the top two drawers slightly shorter and each drawer width 1/4" smaller so you would only need one sheet of 3/4"plywood making it much less expensive!  The remaining design and construction methods are the same as my dresser - consider this the new and improved version!  The Purebond really made this dresser pretty!

(This is a mod of Patrick's Beach Dresser from anawhite.com - thanks!)

 Link to these plans on ana-white.com


***special note***  If you do not have a jigsaw or if you are planning to stain the dresser, there is a modification for each instance in step 4.  Each of these requires the purchase of an additional 1x2x6.

SHOPPING LIST

Wood:

4 - 1x2x8
1 - 1x2x6
2 - 1x3x6
1 - 1x5x6
3 - 1x8x8
1 sheet 3/4" birch plywood
1 sheet 1/2" birch plywood
2 sheets 1/4" birch plywood (review cut list below before purchasing)
8 pair 14"  euro drawer slides
16 knobs
2" finish nails
1 1/4" finish nails
5/8" finish nails
1 1/4" pocket hole screws
wood  glue
wood filler


TOOLS

measuring tape
square
safety glasses
hammer or nailer
hearing protection
drill
table saw
compound miter saw
kreg jig

CUT LIST - Boards

Side trim:
4 - 1x2 @14 1/4"

Legs:
4 - 2x2 @35 1/4"

Front trim:  
2 - 2x2 @ 62 1/4"

Back brace:
1 - 1x2 @ 62 1/4"

Drawer dividers:
6 - 1x2 @ 30 3/4"

Small drawer fronts:
2 - 1x5 @ 30 1/2"

Large drawer fronts:
6 - 1x8 @ 30 1/2"

Top trim:
1 - 1x2 @ 67 1/4"
2 - 1x2 @ 18 1/4"

CUT LIST - Plywood

3/4 Plywood:

Sides:
2 - 14 1/4" x 32 1/2"

Center:
1 - 17 1/4" x 31 3/4"

Top and bottom:
2 - 15 3/4" x 62 1/4"

1/2" Plywood

Large drawer front/backs:
12 - 5 3/4" x 28 3/4"

Small drawer front/backs:
4 - 3 1/2" x 28 3/4"

Large drawer sides:
12 - 5 3/4" x 14"

Small drawer sides:
4 - 3 1/2" x 14"

1/4" Plywood

Drawer bottoms:
8 - 14" x 29 3/4"

Back:
1 - 32 1/2" x 65 1/4"


Plywood diagrams
 If you are getting this cut at a store, have them make the 32 1/2 rip cut to make the sides.  Having the sides exactly the same measurement is very important to getting the dresser square.


These are the drawer sides and front/backs.  I like to lightly label each crosscut by its row number.  For example, each drawer front/back from the first rip cut would be labeled 'row a.'  This way, I know to pair two 'row a' pieces for one drawer which ensures the pieces will be exactly the same length helping to make the drawer box square.  If I matched a front/back from row a with one from row b, they might be slightly off in measurement.  Likewise, I match sides from the same rows.


 You may not need the second sheet if you have some scrap 1/4" already.


PLEASE read through the directions entirely before starting this project.  Please use eye and hearing protection as well as any recommended safety features on your equipment.


Step 1.    Predrill 4 pocket holes in the inside top of each side to use later to attach the dresser top.  Attach trim to sides with glue and either 1 1/4" finish nails or screws from the inside.  The plywood has a 'good' and a 'not so good' side, so make sure you face the good side out.


Step 2.  Attach the posts to each side with pocket holes and 1 1/4" screws keeping the tops flush.


Step 3.   Attach the dresser bottom to the sides keeping the back of the dresser bottom flush with the back legs.  There should be a 1 1/2" space at the front.  Lay the pieces on the ground like the dresser is on its back.  Making sure each corner is square, attach using pocket holes and 1 1/4" screws from underneath.


Step 4:  Using a jigsaw, cut inserts in center section as shown below.  In addition to drawing the lines, you may want to use a straight edge to keep these corners square.


***no jigsaw*** 

If you don't have a jigsaw, make the center dimenstions as shown below and attach 1x2s as shown.  The extra 1x2 cut will be 1@ 29 1/2" and 1 @ 31".  Use pocket hole screws to screw from the center section into the 1x2s.  Try to place these where the center of the drawers will be to avoid interfering with the drawer divider or drawer slide placement.

 ***staining the dresser***

If you want to stain the dresser, this option will let you avoid sanding the plywood edge to accommodate edge banding and will also keep all the front trim the same type of wood taking the stain more evenly.  The extra 1x2 cut will be 1@ 29 1/2".  Use pocket hole screws to screw from the center section into the 1x2.  Try to place these where the center of the drawers will be to avoid interfering with the drawer divider or drawer slide placement.


 Step 5:  With the dresser still on its back, attach the center section using plenty of glue and screw from underneath.  Use 5 1 1/4" screws.


Step 6.  Attach front trim pieces (2x2s)  using the cutouts as guides.  For the bottom trim, glue and use 2" finish nails or pocket holes from underneath.  Screw directly from underneath into the cutout using 2 1/4"   screws.  

For the top trim, attach with 2 pocket holes on each side underneath and screw directly from the top into the center cutout using 2 1/4" screws.  (I also used glue on each cutout.)


Step 7.   Attach the 1x2 brace to the back with pocket holes under each side and screwing directly into the cutout using 1 1/4" screws.


Step 8:  Drill 2 pocket holes into each end of the drawer dividers.  With the holes facing downward, attach to the center and sides.  Cut a piece of wood 7 1/2" and one 4 3/4" to use as a guide/jig for each opening.  It is very important that each opening is square.


Step 9:  Build drawer boxes as shown.  There should be 6 larger and 2 smaller.  Check for square.  Put your pocket holes in the front and the very back.  The drawer fronts will cover the front pocket holes, and you won't ever see the back holes.


Step 10:  Add drawer bottoms using glue and 5/8" finish nails.


Step 11:  Install drawer glides according to package directions allowing for a 3/4" inset to accommodate the drawer front.  Working one drawer at a time, put the drawer box in the dresser.  Using 1/8" craft wood strips as spacers on all four sides, position drawer front and clamp.  Attach using a few 1 1/4" nails.  Don't put nails where your knobs will be be.  I like to write in pencil where the drawer was originally fit (e.g. L4 for left side, 4th drawer down.)  I found that the 1x8s I used varied slightly in width.  (It's probably overkill, but I wanted to be extra cautious!)


Step 12:  Attach trim to top using glue and pocket holes from underneath or 2" finish nails.  (If you don't want to miter the corners, cut the 2 side pieces to 15 3/4" and do a butt joint with the unmitered 67 1/4" front trim piece.
Step 13.  Place dresser top upside down on the ground.  Remove drawers, and place dress upside down so that the backs of the dresser and dresser top are flush and there is a 1" overhang on the front and sides.   Attach using the pocket holes and 1 1/4" screws.  Also, screw through the brace into the top using 1 1/4" screws.


Step 14.  Using glue and 5/8" finish nails, attach back to dresser.


*This post was written before I changed the name of my blog.*
Friday, February 1, 2013

Tips on Building Drawers

Here are some of the things I learned while building 8 drawers.
1.  Definitely listen to Ana White, and buy the cheap euro-slide mounts.  Don't install the dresser/cabinet back until your drawers are mounted.

2.  If you are making more than 4 drawer boxes of the same size, you will likely need to rip 2 sections for both the sides and the fronts/backs.  The picture below shows my cut lines for making 8 drawers each 5 7/8" high.  For an easy way to keep the boxes square, label as shown below.  As long as your cuts are straight, making making 4 drawers of  "1"s and "3"s  and another 4 of "2"s and "4"s ensures that they are all exactly the same size.  My husband (engineer, of course!) did this.


3.  Art from Woodcraft taught us to make drawers my keeping the sides of the drawer the full desired length so they would have a clean look.  If you are using drawer faces, you can keep the pocket holes hidden by drilling them in on the front of the drawer and the very back of the drawer.  The drawer face will cover the front holes, and you will never see the back of the drawer.


4.  Here is a simple way to make sure you drawer faces are even.  The inset drawers need an 1/8 inch spacing all the way around.  You can find craft wood at Michaels that is 3x12 and 1/8 inch thick.  I cut one and used one piece on each side and then 2 full pieces on both the top and bottom.  The length made sure the drawer was supported and didn't go wonky and made the job much easier.

5.  As I fitted each drawer's slides to the opening, I marked in pencil on the back of the drawer where it had been fitted.  So if it was the top right drawer, it was R1.  This way, I always know which opening it belonged to.  If each opening and drawer were perfectly square and perfectly the same in measurement, you wouldn't need to do this, but mine had very slight variations.  Even the 1x8s that I used for the drawer fronts were also very slightly different, so it helps to keep them straight.

6.   Make s simple jig to drill precise holes for your knobs.  I used a scrap of the same wood from the drawer front with i piece of 1x2 on the top and on one side.  The 'drawer' part should be centered on the 1x2s so there is overhang on front and back.  I drilled 4 1/2 inches from the side.  (Make sure you are drilling straight into your wood!  It is very easy to push the bit through on a slight diagonal which will make your knobs slanted.)


On the right hand side of the drawer, clamp the jig so the 1x2s are on the top and side and drill.  For the left side, turn the jig so the 1x2s are again on the top and side, clamp, and drill.  This method ensures that not only are the holes the same distance from the sides but from the top as well.  (I had noticed that my hole wasn't precisely centered vertically, but since the holes are the same distance from the top, you never see it!)

 *This post was written before I changed the name of my blog.*

Monday, January 28, 2013

Finished Master Bedroom Dresser


Here is my new dresser!

The most special part of it isn't that I made it; instead, it is something you can't see.

My son, husband and I each wrote messages on the piece that would be the inside back of the dresser.  My son wrote his name and the date in his little 6 yr old scrawl along with a funny message.  My husband wrote about a funny book that they love to read.  I wrote a silly thing what little guy and I always say to each other which is 'I love you more than my Jimmy Choo shoes.'  Can't tell you why it started one day, but he knew it got a laugh by the time he was 3 yrs old, and said it often lol!!

We will always know that there are special messages to each other hidden in the dresser.  Yet another reason to build your own stuff!

Next post -  hopefully, the finished bed.

 *This post was written before I changed the name of my blog.*

Thursday, January 17, 2013

Master Dresser Project

The master bedroom is going to be the first room I tackle because a very special project is nearly done - a dresser built by me!  Can hardly believe that I get to say that!  Here are some pictures of it in progress.
Building the box - summer


Attaching drawer fronts - winter


Nearly finished!


And how did I become a furniture making mama, you ask?  (Not that anyone is asking since my husband is the only one who is reading this.)  My absolute idol on the internet is an amazing woman named Ana White.  You can find here facebook site here  www.facebook.com/knockoffwood.com and her main website here www.ana-white.com.   She lives in Alaska and builds furniture, houses, and huge crowds of fans.  Ana generously posts plans for everything from furniture to toys, and they are all free.  She is so generous with her personal time answering a lot of questions from newbies like me, and her readers also give great guidance and support.

After discovering Ana early last year, I decided that I would take a weekend cabinet-making class at our local Woodcraft.  Our instructor, Art, taught us the basics of drawing up our own plans and helped me to learn the table saw, track saw, and the Kreg jig pocket hole thing. (Thanks, Art!)

The dresser plan is based on the Patrick's Beach Dresser on Ana's site but doubled in width and different legs.  You can see all sorts of modification to plans on the Brag Posts on Ana's site.

So why a dresser?  My hubs and I always joked that when our son grew up, he would think that his parents' favorite hobby was dresser shopping.  No kidding!  We have been shopping for a dresser for 8 years, and if we liked them, they were too expensive.   Plus, we wanted a very specific simple style.  Enter my first build.  (I don't advise this as a first build.  Please don't. Pick something that doesn't need to be squared.  Mark Twain said, "Ignorance and confidence, and success is assured.  I was definitely ignorant; confident, naaah, mostly ignorant.)

It's true that I have been building it in our family room since August, but it is massive and it does have 8 drawers.  And, I had to wait for a sale on compound miter saws.  And I made several  a few mistakes that had to be redone.  And I had to sand and sand.  And I became paralyzed at the thought of staining and finishing the thing and let it sit for a month because I didn't want to ruin it.

But now, other than feet, which will be completed this week, it is FINISHED! There are some imperfections, but so what?! Yea me!  Building is so much fun.  Pics of the final dresser next post.

*This post was written before I changed the name of my blog.*

Monday, January 7, 2013

So many unfinished projects...

I cannot believe that I am going to actually show people my unfinished, undecorated house, but you first have to admit you have a problem, right?

When I was working at a company owned mostly by investors from Louisiana, they had a guy who had the funniest expressions.  Whenever there was something unpleasant to face up to, he would say, "Let's get that dead cat out on the table."  Never knew what killed the cat.  Or why it was still around and not properly buried.  Or what good it would do to have it ON the table, but the saying always makes me laugh.  Right now, I can hear his voice in my head as I prepare to face the unpleasantness that is my house and my slothy (is that a word? it should be!) ways.

So here they are...

Silver surfer in my son's playroom - doesn't have a hand and hasn't for over 2 years.  I painted 12 versions of that hand in our old house, and just haven't had the stomach for spending time on it here.   (His buddy, Iron Man, has hands but they are just red blobs.  20 minutes to give him fingers - I think he's earned them, don't you?!)  Also, the metallic paint on the surf board shows up really poorly with the flash - it actually looks normal in person.


8 foot Captain Rex and two clone troopers in my son's bedroom.  I spent days and days  trying to figure out the drawing from a very dark poster and got this far.  Then I saw an outline drawing in a coloring book someone gave us which would have saved me a good 20 hours, became very frustrated, and these joined Silver Surfer in never never land.  4 hours I think to finish the outlining,  gun detail and general clean up.


That sad little tree adds quite a statement, doesn't it??


R2D2 - seriously it would take 30 minutes to finish this guy.  It's been 6 months...

(Accidentally captured yet another unfinished project - the towel bars for his bathroom.  They're about to celebrate their 2nd anniversary sitting in that same corner.)


Started making slipcovers for my kitchen chairs, but after 4 of them, I decided I didn't like the fabric - too  wrinkly.  It has now been a year. We had our festive Christmas meal with the table looking exactly like that even though I bookmarked 50 beautiful holiday table ideas.  None of them were going to make this look nice LOL!


There are probably a dozen more, but I am making myself a little crazy just thinking of how far in the weeds I am.

Thankfully, I have discovered the amazing Ana White and a slew of other incredible bloggers, crafters, woodworkers and artists, and am ready to start completing each room starting with our bedroom.

I would love to hear if any of you all have had similar experiences!  Good luck to me!

*This post was written before I changed the name of my blog.*